Pi-hole: The Ultimate Network-Level Ad Blocker for Your Home and Business, With Setup Guide

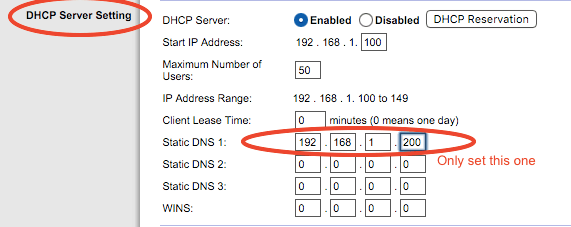
Table of Content
Pi-hole is an open-source network-level ad blocker that acts as a DNS sinkhole, filtering out ads and unwanted content before they even reach your devices.
Designed to be installed on a small device like a Raspberry Pi, Pi-hole provides a powerful, centralized solution for blocking ads across all devices on your network—without the need for individual ad blockers on each device.
What is Pi-hole?
Pi-hole functions as a DNS server, intercepting DNS queries for ads and trackers, and blocking them before they can load. It replaces the DNS server provided by your ISP, allowing you to control what content gets blocked across your entire network.

Pi-hole is particularly useful for environments with multiple devices, such as smart TVs, gaming consoles, and mobile devices, where traditional ad blockers might not work.
Key Features
- Network-Wide Ad Blocking: Pi-hole blocks ads and trackers for every device on your network, providing a seamless, ad-free browsing experience without the need for individual browser extensions or ad-blocking apps.
- Privacy Protection: By blocking unwanted domains at the DNS level, Pi-hole prevents trackers from collecting data on your browsing habits, enhancing your online privacy.
- Lightweight and Low-Power: Pi-hole is designed to run on low-power devices like the Raspberry Pi, making it an efficient solution that doesn’t require a full-scale server.
- Custom Block Lists: Pi-hole allows you to use pre-configured block lists or create your own, giving you control over what gets blocked. You can also whitelist domains if needed.
- Comprehensive Analytics: Pi-hole provides a detailed dashboard with real-time statistics on DNS queries, blocked domains, and device-specific activity. This transparency allows you to see which domains are being blocked and helps you fine-tune your setup.
- Easy Setup and Maintenance: Pi-hole is user-friendly with a straightforward installation process and an intuitive web interface. Regular updates and an active community ensure that Pi-hole remains secure and up-to-date.
- Integration with Other Tools: Pi-hole can be integrated with other network security tools, such as Unbound for DNS over HTTPS, or combined with a VPN to extend ad-blocking to devices outside your home network.
Benefits of Using Pi-hole
- Improved Browsing Speed: By blocking ads and trackers, Pi-hole can significantly reduce page load times, providing a faster browsing experience.
- Reduced Data Usage: Especially useful for mobile devices, Pi-hole cuts down on data usage by preventing the loading of ad content.
- Enhanced Network Performance: With fewer ads and trackers to process, Pi-hole can improve overall network performance and reduce bandwidth consumption.
Use Cases
- Home Networks: Pi-hole is ideal for home networks with multiple devices, providing a single point of control for ad blocking.
- Small Businesses: For small offices, Pi-hole offers an easy way to block distractions and protect employee privacy.
- Public Wi-Fi: Pi-hole can be used in public Wi-Fi setups to enhance user experience by blocking intrusive ads and trackers.
Installation and Setup
Installing Pi-hole is a straightforward process, especially on a Raspberry Pi. The official website provides detailed installation guides for different platforms. Once installed, you can access the Pi-hole dashboard through a web browser to configure block lists, monitor activity, and adjust settings.
For advanced users, Pi-hole offers extensive customization options, including the ability to use custom DNS servers, apply regex filters, and integrate with existing network infrastructure.
Here’s a simple guide to install Pi-hole on a Linux system:
Prerequisites
- A Linux machine (such as a Raspberry Pi, Ubuntu server, or Debian-based system)
- Sudo privileges or root access
- A static IP address assigned to the device where you plan to install Pi-hole
Step 1: Update Your System
Before installing Pi-hole, ensure that your system is up-to-date by running the following commands:
sudo apt update
sudo apt upgrade -y
Step 2: Install Pi-hole
Pi-hole provides an automated installation script that takes care of everything. You can install Pi-hole by running the following command:
curl -sSL https://install.pi-hole.net | bash
This command will download and run the Pi-hole installation script.
Step 3: Configure Pi-hole During Installation
During the installation process, you will be prompted to configure various options:
- Network Interface: Choose the network interface Pi-hole should listen on (typically
eth0for wired connections orwlan0for wireless). - DNS Provider: Select your preferred upstream DNS provider (e.g., Google, OpenDNS, Cloudflare).
- Blocking Lists: Pi-hole comes with pre-configured ad block lists, but you can add more later.
- IP Address Settings: Confirm that the static IP address, gateway, and other network settings are correct.
- Web Interface: Choose whether to install the web interface for managing Pi-hole.
- Log Queries: Decide whether Pi-hole should log DNS queries and how much information to log.
Step 4: Access the Pi-hole Admin Interface
Once the installation is complete, you can access the Pi-hole admin interface using your web browser. Enter the following URL, replacing IP_ADDRESS with the IP address of your Pi-hole device:
http://IP_ADDRESS/admin
Step 5: Set Up Pi-hole as Your DNS Server
To start using Pi-hole, you need to configure your devices or your router to use Pi-hole as the DNS server:
- On individual devices: Go to the network settings and manually set the DNS server to the IP address of your Pi-hole device.
- On your router: Log in to your router’s admin panel and set the DNS server to the IP address of your Pi-hole device. This will route all DNS requests through Pi-hole.
Step 6: Update Pi-hole
To keep Pi-hole updated, run the following command periodically:
pihole -up
This will check for updates and apply them.
Step 7: (Optional) Additional Configuration
- Adding Block Lists: You can add more block lists through the Pi-hole admin interface under “Group Management” -> “Adlists”.
- Whitelist/Blacklist: Manage allowed or blocked domains under “Whitelist” and “Blacklist” in the admin interface.
- Statistics and Logs: View DNS query statistics, logs, and other data in the admin interface.
Conclusion
Pi-hole is an effective and easy-to-use tool for blocking ads and unwanted content across your entire network. By following this guide, you can install and configure Pi-hole on your network, giving you greater control over the content that passes through your devices.